Documenting design
You need a website, now!
This page consists of 1) a step-by-step quickstart to get one published from our MDEF template, and 2) A lot of additional information to understand what you just did 😂
How to set up your documentation
In this step-by-step quickstart you are going to find the basic instructions on how to create the documentation webpage that you will use to document your MDEF journey. You will have to perform these tasks in order (feel free to track your progress with the checkboxes!):
- Create a github.com account
- Install the local program git
- Generate an SSH key
- Link SSH key to github account
- Clone template
- Change origin
- Make and publish changes
- Explore!
1. Create a github.com account
github.com is a git hosting service. We could use a different one, like gitlab.com, or host it ourselves, but we have chosen this option.
Please sign up for Github with your iaac.net student email.
2. Install the local program git
Git is a free and open source distributed version control system. It will allow you to keep track of the files and history of the repository that will contain your webpage.
We will not have time today to go deeper into it, sadly, but you can learn more below, if you are interested.
In order to install it, depending on your platform:
-
Windows: Download and install Gitbash.
-
Mac: Start the program
Terminal. Go tohomebrew, click on the clipboard icon, paste into your terminal and click enter. Once it’s done, you should be able to typebrew install giton the terminal and click enter to install git. -
Linux:
sudo apt-get git. You probably know what to do.
Note
From now on, you’ll find in this guide lines like the following:
You are supposed to type those into your terminal. That means “git bash” for Windows users and the Terminal app for Mac users.
3. Generate an SSH key
An SSH public/private key pair works like a password, but it’s basically uncrackable. It will allow you to authenticate before the remote server so that you can publish your website.
The steps to generate it are:
-
Generate your SSH key:
You will get some questions. Read them carefully so that you understand a bit what’s going on, and click enter to accept the defaults.
The following command will show you your public key, just for curiosity:
-
Copy your key (running these commands will copy the key into your system clipboard)
Windows
macOS
linux
4. Link SSH key to github account
This is how you connect your local copy of the website to the remote. This way, you will be able to publish changes from your laptop without needing to type a username and password.
In github.com, click on your profile picture in the top right corner and choose “Settings” in the menu.
In the next page, find the section “SSH and GPG keys”. Click on it and then on “new SSH key”.
In the next page, paste what you copied in step 3 into the “Key” text box. It will look something like:
ssh-rsa AAAAB3NzaC1yc2EAAAADAQABAAABgQCdGejIbJLZP2NvjMVFMaS4j343QzVxGSR9Lnk/fyvhZhZM3IdKqOKtg52H0I2ptVpVGwzIivqFuxHXM04mF++tLH3Gwdxb4fdWiLExNp+VGWY6AbvMLpm2WD73Iijw2tope8O1EjrLeLWzv2eD/wnbIIQpbBzSyiemhORfTxy2MDIJXdx6+glE4mSSUrNet49GkR6de0BIJNWcLaAxtUwp+eQLUv0XF2XTRL+oo4NJegVRkjjSMxPTA7san4jXunnBL33ygilggj1Ku1vlG3HhCIH63/XTUiI1LNp54tUzq7vVS9M7L1EPp4E4BoEkb/az94M9GISi7K5SG/L3nGNcAoJLyhAx1Oq0IoyPZrN+nyfqzogPsLXSEVHN9nhmsjv2yicvOcRYms2GdufSrI858z+WsCto0CGGf2YOeKY1bhtGJQRwTul2uBHboM7GRGAaKcEYaa0EXIFHiKD9AF3rcfCw6Sw3j5C1EPlTGaFj9TMQw6xa2kUR0+d3ijmQBYs= daniel.mateos@iaac.net
Fill the “Title” field with anything you like. “MDEF”, for example.
Cool! Now any git commands that you run on your laptop will be able to interact with github.
If are interested in more context, you can check the official docs for this in this github page
5. Clone template
We are back to the terminal! Almost there.
-
Add your Git username and set your email (it can even made up, but I don’t recommend it):
-
Clone the basic template:
Now you have the files for the website in your local computer
6. Change origin
Right now, git remembers that the repo was cloned from fablabbcn/mdef-template.git. If you make changes and try to publish, it will try to publish to fablabbcn’s account, which you are not allowed to. You need to make your own repo in github and link your local copy to it.
-
Create your own project in Github - Direct access - Make sure that is public!! and do not add either a
READMEnor aLICENSE. You’ll be able to do that later. -
Tell your local repository to push to the new project in Github. You’ll need to type these into a terminal that is active inside the project folder, which was created in the previous step.
7. Make and publish changes
Awesome! You have the template on your computer. But there’s no website anywere! For that, you need to activate a couple of options on github.
- Go to your repo settings (not general github settings, the settings specific to that one repo inside github) and click on the left on “Actions” then “General”. In the bottom of that page (section “Workflow permissions”) select “Read and write permissions”. This allows github to generate the
htmlwebsite source from the markdown in the template. If you want to understand what that means, go to the markdown and mkdocs sections below and read up!
Right now, there’s still no website. The automagic triggers on publishing changes. So go ahead and make your first change! Go to the file mkdocs.yml and write your name instead of “Student Name”. Do this on your computer; changing files through the Github interface may seem easier now but will bite you later. You can use any editor.
After making the changes, you need to commit them. This registers the changes with git. Then you will push them: that sends them from the local git to the github server. Do that by typing:
Awesome! Your changes are in github. You might notice a yellow dot in the github interface next to the commit message that you just typed. That means the html build Action triggered and is ongoing. After a minute or so, if you reload the page, it will turn into a green checkmark.
But there’s no website aynwhere! That’s because we have to instruct github to publish the generated html.
- In the “Pages” section of your repo settings, find “Build and deployment”, and in “Source” select “deploy from a branch”. Immediately after, in “Branch”, select “gh-pages” in the drop-down. Save the setting. What this does is publish the
htmlthat the previous step generated, automagically.
A new Action will trigger, and after a couple of minutes you should have a published website!!! It will be live at username.github.io/reponame.
8. Explore!
Now you have a website! It is written in Markdown and uses mkdocs to convert that markdown to html. More specically still, we are using the mkdocs-material theme. If you want to do something specific and you don’t know how, use those keywords to guide your research. Right now, I want you to look through the files in your computer, and change a couple things.
The specific things are up to you. You might want to write something about yourself in the “About me” page, or explain what MDEF is in the index.md, or link to some page that is relevant to you. These kinds of content modification are done through the .md files in the docs directory.
Or change some colors to make the website more you. Or change the font. These kinds of “all-website” changes are usually done through the mkdocs.yml file. For example, for the colors, go to that file and find the palette section.
Experiment and play. If you break something and push that broken version, you will not lose anything. The website will simply stay published with the last non-broken version.
Once you are done, you will have to register your changes in the local repo, then push them to the remote. You do that by the workflow add-commit-push
That should trigger page building! You are done for today. Grab something refreshing and chill for a bit.
About the commit message
This is a general point of failure for many many students (and instructors) that do not make a relevant commit message.
Write a meaningful commit message. This should answer the question:
“If I apply this commit, I will…
“.
For example:
“upload final project idea”
This is not OK at all and will not help anyone to trace problems (and they will happen):

A typical example: “Update README.md” is a terrible commit message. A better message for the same changes would be, for example: “Expand installation instructions”, or “Change links to new hosting provider”
Congrats! You have a website now that can evolve into a true expression of yourself and of the work you’ll be doing here.
You will notice that the pages are not written in html, but in markdown, which is easier to read and write in its raw form. The program that we are using to convert markdown into html is called mkdocs and it’s in the category of “static site generators” (SSGs). I recommend that you install it locally so that you don’t need to publish and cross your fingers every time you make changes. Check out the mkdocs section below to learn more.
Additional info
- The Terminal: The real face of computing. Everything about it is sacred and powerful.
- Git: What is it? How to use version control.
- Markdown: Let’s make web easy.
- Mkdocs: How to configure your page.
The Terminal
The terminal is a scary thing at the beggining, but you are going to get use to it and, if you do not want, you are not going to us it much. But to get started with your page it’s important that you learn how to navigate around your computer using the terminal. Here there is a list of the more basic commands that you are going to use.
The command pwd will print the directory where you are working in that terminal, it can be understand as the folder you are in.
Using the ls command you will see whats inside your actual directory, all files and folder will be listed. Is very usefull to know where to navigate.
To navigate to a different folder you will use the cd command. By default it needs a relative path for the new folder inside the actual one, to go back outside of the actual folder you need to use cd .. to go back one level. If you the full path of the folder you want to navigate to you can use cd /folder_path to enter it.
This will create a new folder with the specified name like mkdir newFolderName.
With the command touch you can create a new file, again specifiny the name as touch newFileName.
Clear or Ctrl + L you can clear the output of the terminal to clean your screen.
Note
Using the terminal there are some shortcut that come handy when working. The first one is to use the tab key to autocomplete the names of the files, and the second one is to use the keyboard Up and Down arrows to navigate to the history of commands.
Git
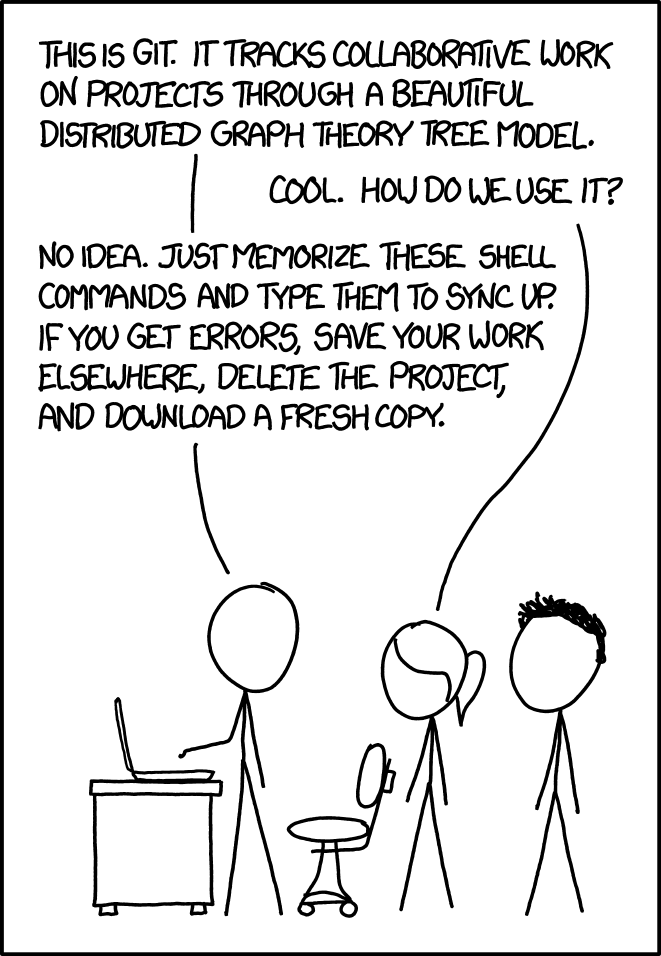
Git is a free and open source distributed version control system. It is an amazing piece of software and we will barely begin to scratch its surface.
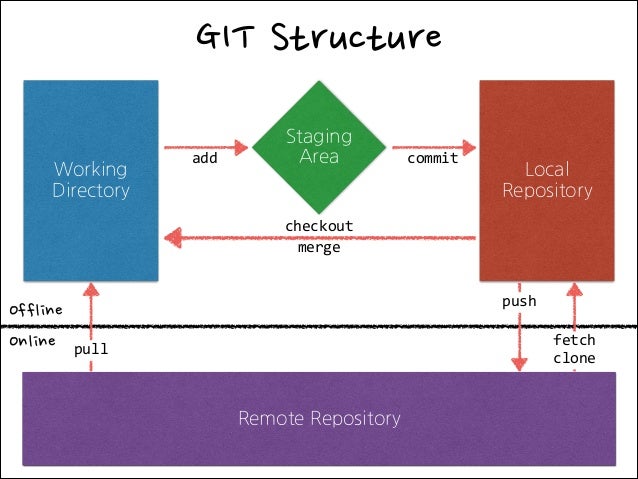
Git Local/Remote Structure
As a reference, this is a basic structure of the local/remote structure using git.
Interactions
Here there are some basic interactions you will normally do with your git repositories.
Cloning
Cloning takes a remote repository and literally clones it into a local one:
Status
Shows what is the status of your local/remote repository - if there are local or remote changes, or things to be pushed:
Log
Shows the history of the local and remote repositories as a list of commits with more info:
Basic changes workflow
You will most likely be using this workflow for git
Pull-add-commit-push
-
Download the last copy from the online repository and merge it with your local working directory:
-
Add the new files you added to git
or to review each
sloc: -
Now name your update, so you know what you changed with this push.
About the commit message
This is a general point of failure for many many students (and instructors) that do not make a relevant commit message.
Write a meaningful commit message. This should answer the question:
“If I apply this commit, I will…
“.
For example:
“uploading final project idea”
This is not OK at all and will not help anyone to trace problems (and they will happen):

-
Upload to the Repository
This is 1% of what git does
Git is much more than this. Do not hesitate to visit the docs to get more info or to follow a tutorial on more advanced features.
Markdown

When it comes to web development there are tons of tools to do it. The basic way to create a webpage is by using HTML code and normally it’s styled by CSS and animated by JavaScript.
Markdown is a lightweight markup language for creating formatted text using a plain-text editor. It makes web-development more human readable, and also easier to start with. It’s not a replacement for HTML, in fact it is converted to html in the deployment of the page.
Here there is a nice Markdown Cheat Sheet with the basic syntax.
Another good tool to start with quickly and to create notes is Hackmd.io.
Mkdocs
Mkdocs is a static site generator that’s geared towards building project documentation. Documentation source files are written in Markdown, and configured with a single YAML configuration file, making it customizable and easy to start with. There are many themes available, but we will be using Material theme for this page.
Check Material for Mkdocs page for more documentation on how to customize and use this theme.
YAML file
In the YAML file is where the magic happens. This file will define how your page looks like, where you can change the font, the colours, the logos and navigation of your page, and then all the content will be stored into the docs folder.
Installing Mkdocs locally
You can install mkdocs locally to serve your page locally, without pushing it to a server.
I highly recommend it, so that you can check your changes instantly as you make them.
To do so, follow their documentation to install it. You will need Python and Pip to do it.