How to set up your documentation
In this guide you are going to find the basic instructions on how to create your documentation webpage that you will use to document your MDEF journy. To do it this guide will cover different points:
- The Terminal: First you need to know basic command line commands to navigate througth files in your computer.
- Git: What is it? How to use version control.
- Markdown: Let’s make web easy.
- Mkdocs: How to configure your page.
- How to start from the template: it’s time to create you page!
The Terminal
The terminal is a scary thing at the beggining, but you are going to get use to it and, if you do not want, you are not going to us it much. But to get started with your page it’s important that you learn how to navigate around your computer using the terminal. Here there is a list of the more basic commands that you are going to use.
The command pwd will print the directory where you are working in that terminal, it can be understand as the folder you are in.
Using the ls command you will see whats inside your actual directory, all files and folder will be listed. Is very usefull to know where to navigate.
To navigate to a different folder you will use the cd command. By default it needs a relative path for the new folder inside the actual one, to go back outside of the actual folder you need to use cd .. to go back one level. If you the full path of the folder you want to navigate to you can use cd /folder_path to enter it.
This will create a new folder with the specified name like mkdir newFolderName.
With the command touch you can create a new file, again specifiny the name as touch newFileName.
Clear or Ctrl + L you can clear the output of the terminal to clean your screen.
Note
Using the terminal there are some shortcut that come handy when working. The first one is to use the tab key to autocomplete the names of the files, and the second one is to use the keyboard Up and Down arrows to navigate to the history of commands.
Git
![]()
Git is a free and open source distributed version control system. It will allow you to keep track of the files and history of your repository that will contain your webpage. Together with Git, you are going to be using GitHub to host your repository online and serve your page to the internet.
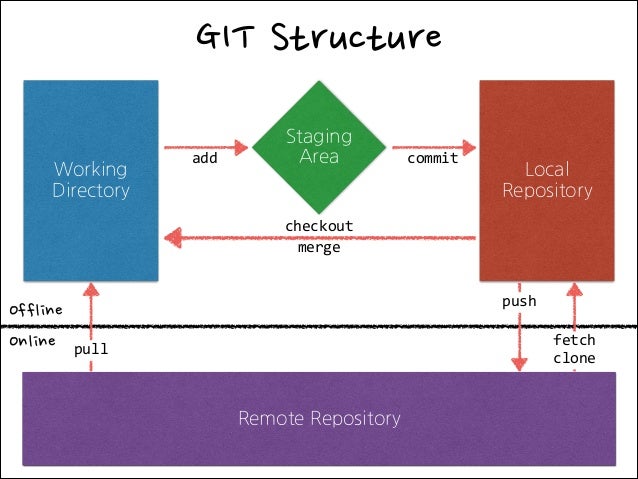
Git Local/Remote Structure
As a reference, this is a basic structure of the local/remote structure using git.
Interactions
Here there are some basic interactions you will normally do with your git repositories.
Cloning
Cloning takes a remote repository and literally clones it into a local one:
Status
Shows what is the status of your local/remote repository - if there are local or remote changes, or things to be pushed:
Log
Shows the history of the local and remote repositories as a list of commits with more info:
Basic changes workflow
You will most likely be using this workflow for git
Pull-add-commit-push
-
Download the last copy from the online repository and merge it with your local working directory:
-
Add the new files you added to git
or to review each
sloc: -
Now name your update, so you know what you changed with this push.
About the commit message
This is a general point of failure for many many students (and instructors) that do not make a relevant commit message.
Write a meaningful commit message. This should answer the question:
“If I apply this commit, I will…
“.
For example:
“uploading final project idea”
This is not OK at all and will not help anyone to trace problems (and they will happen):

-
Upload to the Repository
This is 1% of what git does
Git is much more than this. Do not hesitate to visit the docs to get more info or to follow a tutorial on more advanced features.
Setting up git
![]()
Note
All information provided in this page comes from here
-
Windows: Gitbash for windows users. This will install git and git bash, a terminal for using the command line in Windows other than the Power Shell.
-
Mac: command line and install from here. You can use
homebrewas a package manager. We recommend to install Xcode first (from the app store, for example) and thenhomebrew. -
Linux: Use the command
sudo apt-get gitin the Linux Terminal.
Make an account
- Make an account in Github.com using the email you used in the program registration form
Format for the username
Make a username as such: name_surname
For example if my name is…
Andrés López Lee Peters: andres_lopez
Or…
Wongsathon Choonhavan: wongsathon_choonhavan
Do not use dots in your username as you will have problems afterwords.
Go local
- In your terminal, add your Git username and set your email
- Configure you email address for uploading
Generate SSH Keys
- Check if you have an SSH KEY already (If you see a long string starting with ssh-rsa, you can skip the ssh-keygen step):
- Generate your SSH key:
- Now let´s see your keygen
- Copy your key:
Windows
macOS
linux
Go global
Add the copied key to github.com by following this guide
How to start from the template
There are several ways to have a repository:
- In the online git platform, create a repository and then clone it
- In your terminal initialising it from scratch
- Cloning an existing one (most likely)
Online Git platform
If you are using and online web service for git (Github, Gitlab, bitbucket…), you can create a new project or repo by simply going to one of these below and then follow the instructions to clone it:
- New github repo
- New gitlab repo
- and so on…
Terminal from scratch
Step-by-step
-
Navigate to the folder where you want to put or create your repo
-
In the terminal, type:
- If you have a remote already, you can just do:
- And then pull the remote:
Cloning an existing one
If you have a template or an online repository you want to reuse, you can navigate with your terminal to the desired destination folder and do:
MDEF Students
-
Navigate to the folder where you want to put or create your repo
-
Clone your student repository (ssh)
-
Create your own project in Github - Direct access - Make sure that is public!!
-
Tell your local repository to push to the new project in Github:
- Do some edits and then add-commit-push (like this for the first commit):
- For further changes, your workflow should be:
About the commit message
This is a general point of failure for many many students (and instructors) that do not make a relevant commit message.
Write a meaningful commit message. This should answer the question:
“If I apply this commit, I will…
“.
For example:
“uploading final project idea”
This is not OK at all and will not help anyone to trace problems (and they will happen):
